Saturday, 12 August 2017

PuTTY – 30 Useful Putty Commands for Beginners

What Is Putty?

Putty is an open source SSH client used to connect to a remote server. Putty is basically a terminal for windows based operating systems. It supports several network protocols, including SCP, SSH, Telnet, rlogin, and raw socket connection. PuTTY was originally written for Microsoft Windows, but it has been ported to various other operating systems. To work with Putty you need to know few basic Putty Commands.
Say you have a Linux Server set up.
To connect to your server from your PC you can use Putty and type simple SSH commands to perform different basic actions such as creating folders, copying them and so on.

What you will need to use Putty 

1. A Linux based server
2. Putty installed on your computer
3. The server’s IP address
4. Username
5. Password
Download Putty and save it on your desktop. You don’t have to install it just click on it and it will run out of the box.
When you open putty you will see something similar to the below image
putty dashboard
Out of all those options we are interested in well…just one and that’s the Host Name field(the IP address).
Here you need to input your own server’s IP address in order to connect to it.
Just enter the IP address making sure the connection type SSH is checked and port is 22.
Hit open. You will be presented with a black screen like this.
Putty after login with Windows server

Useful SSH Putty Commands

1) How to find out where you are, the pwd command shows you present working directory.
pwd
2) Change directory
cd
The cd command is used to navigate into a specified directory on your server.
Example: cd /home (moves you into the home folder)
3) The same directory
cd .
Using this command you will remain in the same directory you were.
4) Move me up one directory
cd ..
Above command will navigate two steps back from current directory
5) Go to the previous directory
cd –
Above command will navigate to the previous directory.
6) Go to Home folder
cd ~
Above command will navigate to the home directory on your server.
7) Go to root
cd /
Above command will navigate to root.

How to List Directories and Contents

8) List files
ls
usage: ls [option] [file]
Using the ls command in a folder will display all it’s content.
Example: ls /home.
Will return all content of the folder /home.
9) Show me all files in a directory
ls -a
10) Show contents with file size
ls -h
If you wish to see a directory’s contents with file sizes just type ls -h
11) How to see sub-directories recursively
ls -r
The ls -r command is used to see sub-directories recursively.
12) How to see files by file size
ls -is
13) List all folders in directory with details
ls -alh

How to Copy files/folders with Putty Commands

14) Copying a file
cp
To copy a file just use the cp ssh command.
Example:
cp filename.php /home/filename.php
15) Copy a folder with all files
cp -r
This one is used to copy the entire folder with all it’s contents.
16) Copy and rename
cp filename.php /home/filename2.php

How to Move files to different locations

17) Moving a file
mv
Example: mv page.php /home/page.php
18) Move and rename
mv page.php /home/newpage.php
19) Move file up one directory
mv filename ..
example: mv index.html/ ..

How to Create files/folders using Putty Commands

20) Create a folder
mkdir
example: mkdir new-folder
21) Create a file
touch
Use the touch command to create different files and file extensions
Example: touch index.php

How to Compress/Uncompress files?

22) Compressing folders
zip -r foldername.zip foldername
Example: zip -r newfolder.zip newfolder
23) uncompressing folders
unzip
Example: unzip newfolder.zip
24) Compressing folders using tar -czvf
tar -czvf foldername.tar.gz foldername
Example: tar -czvf wp-content.tar.gz wp-content
25) uncompressing folders using tar -czvf
tar -xvf foldername.tar.gz
Example: tar -xvf wp-content.tar.gz

How to Delete/Remove files?

26) Delete a file
rm
To delete a file on your server just use the rm command.
Example: rm index.php
27) Delete all files from a directory
rm *
This command is used to delete all contents from a directory.
Example: rm * foldername
28) Delete a folder/directory
rmdir
Use this command to remove directories.

How to change File permissions?

29) Change file permissions
chmod
Example: chmod 775 newfolder
30) Change permissions of folder and all files inside
chmod 755 folder name -R
Thanks for reading our article and we will keep updating the same articles with more useful commands in coming days. Keep checking this space for more Putty commands.

Wednesday, 1 March 2017

Cannot setup default printer error 0x00000709 in Windows [Solved]

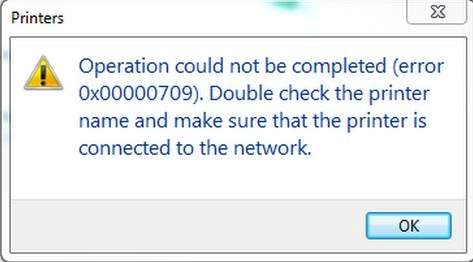
This might have happened to you that you cannot set any printer as default printer and whenever you wanted to setup the default printer, you get the same error message: Operation could not be completed(error 0x00000709). Double click the printer name and make sure that the printer is connected to the network


If you are facing with this issue right now, you could try the way in this post to help you solve it. 

Note: Modifying the registry in your computer could cause irrecoverable error if the modification is done incorrectly, therefore, it is very important for you to back up your registry first. For instructions as to how to back up your registry, please refer to this post here. If any problem occurs, the backed-up registry file will be able to help you roll back to your previous stage. 

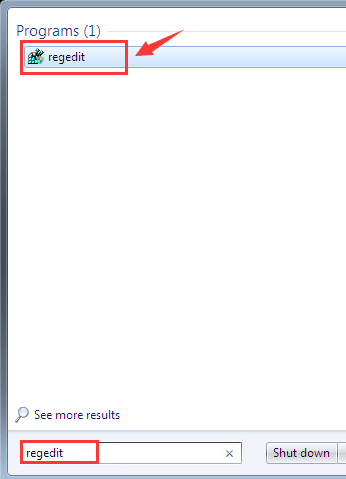
1) Click Start button, then type regedit in the search box and hit Enter


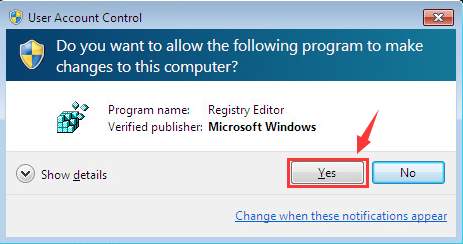
If User Account Control comes up, please choose Yes at the prompt. 

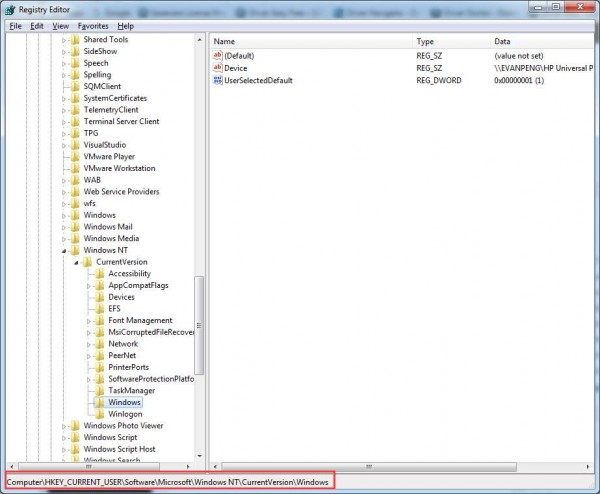
2) Follow the path 
HKEY_CURRENT_USER\Software\Microsoft\WindowsNT\CurrentVersion\Windows. 

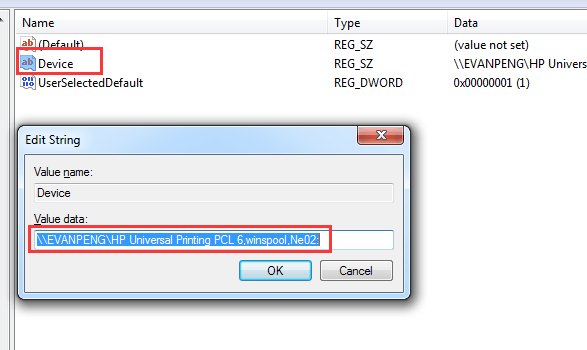
3) In the right panel, you will see the key with the name Device.  Double click it to Modify it. Type in your printer name. The screen shot here is an example only. 


Then click OK to save the change. 

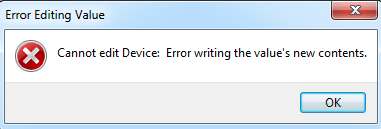
Note: If you encounter this sort of error “Cannot edit Device: Error writing the value’s new contents“, please follow the steps below to set the permission of the key. 


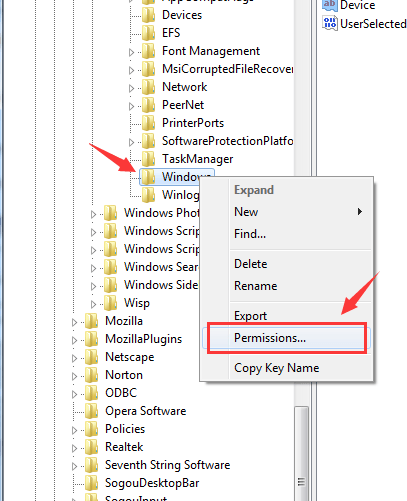
a) Right click Windows key on the left side of the panel and then choose Permissions…


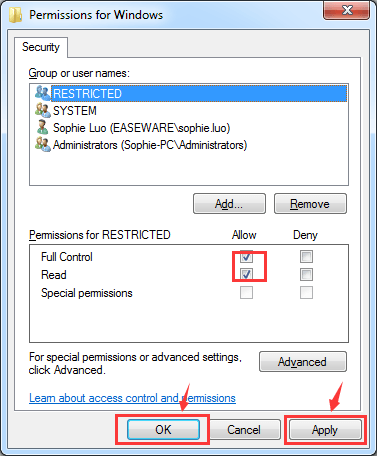
b) Tick the box Allow for Full Control and Read, then hit Apply and click OK to save the change. 


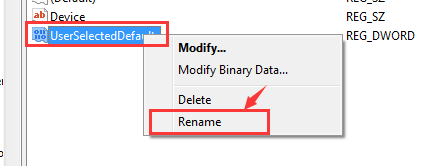
4) Right click the option UserSelectDefault and choose Rename to rename it as your printer name. 


There you go! You should be able to set up your default printer now! 

Friday, 14 October 2016

Create Password Reset Disk using USB Flash drive on Windows 7/8/10

Create Password Reset Disk

Step 1:
Insert your Flash drive into the Computer. Then right click on the Flash drive and click on format.
Step 2:
Click on Start and Click on Control Panel. Under Control Panel click on Users Accounts and Family Safety. Then click on User accounts.
Step 3:
From the right side panel click on “Create a password reset disk”
Step 4:
Follow the Forgotten Password Wizard.
Step 5:
Click next and select the Flash drive from the drop down menu
Create Password Reset Disk
Step 6:
Click Next to Start the process and click next Finish to complete.

^
Now we have the password reset disk ready. Now let’s see how to use it.
Step 1:
Once you type the incorrect password from the logon screen you’ll get reset password option as shown in the figure below
Step 2:
Click on Reset Password option
Step 3:
Make sure you have inserted your Password Reset USB drive and select it from the drop down menu.
Step 4:
Now click next and it will ask you to type in the new password and conform it.
Step 5:
Once you conform the password the click next and finish

Wednesday, 6 May 2015

Windows 8 Keys

Window 8 Product Keys:

As it is a latest and premium version of windows so in order to avail the full and premium features of windows 8 you need a product key so you may enable the full version of window 8 working for you. As it has become the most popular window operating system there are hundreds of thousands of free serial keys for windows available online but most of them are not working properly.

windows-8-product-keys-serial-keys
But you need not to be worried about that because today we have find out 100% working windows 8 product keys, serial keys. The good thing about the window 8 keys is that you can use these keys in different versions and language of window 8th edition. All these keys below are genuine, original and you can use the keys in any version of window 8. Enjoy!


Windows 8.1 serial key : ultimate edition

NTTX3-RV7VB-T7X7F-WQYYY-9Y92F

Windows 8 OS key : Professional edition

XKY4K-2NRWR-8F6P2-448RF-CRYQH

Windows 8 product key : Release preview

TK8TP-9JN6P-7X7WW-RFFTV-B7QPF

Windows 8 product number : Consumer preview

DNJXJ-7XBW8-2378T-X22TX-BKG7J

Windows 8 OS key : Developer’s preview

6RH4V-HNTWC-JQKG8-RFR3R-36498

Windows 8 product key : Developer’s version

Y8N3-H7MMW-C76VJ-YD3XV-MBDKV

6RH4V-HNTWC-JQKG8-RFR3R-36498

4Y8N3-H7MMW-C76VJ-YD3XV-MBDKV

MBFBV-W3DP2-2MVKN-PJCQD-KKTF7

28VNV-HF42G-K2WM9-JXRJQ-2WBQW

NF32V-Q9P3W-7DR7Y-JGWRW-JFCK8


Windows 8 serial key : English

DNJXJ-7XBW8-2378T-X22TX-BKG7J

Windows 8 software key : Chinese

DNJXJ-7XBW8-2378T-X22TX-BKG7J

Windows 8 serial number : German

DNJXJ-7XBW8-2378T-X22TX-BKG7J

Windows 8 unique serial number : French

DNJXJ-7XBW8-2378T-X22TX-BKG7J

Windows 8 product key : Japanese

DNJXJ-7XBW8-2378T-X22TX-BKG7J

Window 8 Serial Keys 100 % Working

2GVN8-TV3C2-K3YM7-MMRVM-BBFDH

967N4-R7KXM-CJKJB-BHGCW-CPKT7

84NRV-6CJR6-DBDXH-FYTBF-4X49V

RRYGR-8JNBY-V2RJ9-TJP4P-749T7

ND8P2-BD2PB-DD8HM-2926R-CRYQH

XWCHQ-CDMYC-9WN2C-BWWTV-YY2KV

BDDNV-BQ27P-9P9JJ-BQJ96-KTJXV

KNTGM-BGJCJ-BPH3X-XX8V4-K4PKV

F8X33-CNV3F-RH7MY-C73YT-XP73H

967N4-R7KXM-CJKJB-BHGCW-CPKT7

HNRGD-JP8FC-6F6CY-2XHYY-RCWXV

84NRV-6CJR6-DBDXH-FYTBF-4X49V

BDDNV-BQ27P-9P9JJ-BQJ96-KTJXV

CDQND-9X68R-RRFYH-8G28W-82KT7

DWV49-3GN3Q-4XMT7-QR9FQ-KKT67

F2M4V-KFNB7-9VVTW-MVRBQ-BG667

F8X33-CNV3F-RH7MY-C73YT-XP73H

GPTCC-XN297-PVGY7-J8FQY-JK49V

HV3TW-MMNBG-X99YX-XV8TJ-2GV3H

J6FW2-HQNPJ-HBB6H-K9VTY-2PKT7

KQWNF-XPMXP-HDK3M-GBV69-Y7RDH

MMRNH-BMB4F-87JR9-D72RY-MY2KV

N4WY8-DVW92-GM8WF-CG872-HH3G7

ND8P2-BD2PB-DD8HM-2926R-CRYQH

RRYGR-8JNBY-V2RJ9-TJP4P-749T7

VHNT7-CPRFX-7FRVJ-T8GVM-8FDG7

84NRV-6CJR6-DBDXH-FYTBF-4X49V

BDDNV-BQ27P-9P9JJ-BQJ96-KTJXV

967N4-R7KXM-CJKJB-BHGCW-CPKT7

KQWNF-XPMXP-HDK3M-GBV69-Y7RDH

F2M4V-KFNB7-9VVTW-MVRBQ-BG667

CR8NP-K37C3-MPD6Q-MBDDY-8FDG7

39DQ2-N4FYQ-GCY6F-JX8QR-TVF9V

VHNT7-CPRFX-7FRVJ-T8GVM-8FDG7

GPTCC-XN297-PVGY7-J8FQY-JK49V

HV3TW-MMNBG-X99YX-XV8TJ-2GV3H

CDQND-9X68R-RRFYH-8G28W-82KT7

7HBX7-N6WK2-PF9HY-QVD2M-JK49V

D32KW-GNPBK-CV3TW-6TB2W-K2BQH

NBWPK-K86W9-27TX3-BQ7RB-KD4DH

2NF99-CQRYR-G6PQ9-WYGJ7-8HRDH

F7BDM-KTNRW-7CYQP-V98KC-W2KT7

4JKWV-MNJCY-8MW3Q-VJYGP-DC73H

KQWNF-XPMXP-HDK3M-GBV69-Y7RDH

MMRNH-BMB4F-87JR9-D72RY-MY2KV

N4WY8-DVW92-GM8WF-CG872-HH3G7

ND8P2-BD2PB-DD8HM-2926R-CRYQH

RRYGR-8JNBY-V2RJ9-TJP4P-749T7

FFX8D-N3WMV-GM6RF-9YRCJ-82KT7

2CMGK-NMW4P-B846H-YXR6P-27F9V

D2GBF-NGBW4-QQRGG-W38YB-BBFDH

NTVHT-YF2M4-J9FJG-BJD66-YG667

GBJJV-YNF4T-R6222-KDBXF-CRYQH

4NMMK-QJH7K-F38H2-FQJ24-2J8XV

84NRV-6CJR6-DBDXH-FYTBF-4X49V

3NHJ7-3WWQK-4RFTH-8FHJY-PRYQH

988NM-XKXT9-7YFWH-H2Q3Q-C34DH

TGXN4-BPPYC-TJYMH-3WXFK-4JMQH

N9C46-MKKKR-2TTT8-FJCJP-4RDG7

Q4NBQ-3DRJD-777XK-MJHDC-749T7

2VTNH-323J4-BWP98-TX9JR-FCWXV

D7KN2-CBVPG-BC7YC-9JDVJ-YPWXV

2GVN8-TV3C2-K3YM7-MMRVM-BBFDH

4NMMK-QJH7K-F38H2-FQJ24-2J8XV

76NDP-PD4JT-6Q4JV-HCDKT-P7F9V

7HBX7-N6WK2-PF9HY-QVD2M-JK49V

Friday, 27 June 2014

How to Activate Microsoft Office 2010 Beta

You may use one of the following Multiple Activation Keys (MAK) to activate your Microsoft Office 2010 Beta products. Microsoft Office Professional Plus 2010, Microsoft Project Professional 2010, and Microsoft Visio Premium 2010 require separate activations. 


Microsoft Office Professional Plus 2010: 22HGX-728MX-BBWX9-7BB8X-J96B4


Visio Premium 2010: PQCFB-YGXGC-TXB66-DH3VW-GCGYQ


Project Professional 2010: CQYRY-3KBR3-JW34C-VGH7M-MQM49


Step 1: Click on the Change Product Key button.


Step 2: Enter the product key from the top of this page that matches the product you are activating and click “Continue.” On the next dialog, click “Install Now” to install your key. You will see a progress bar page and then a dialog box saying configuration has been successful. Click “Close.”

Step 3: Close and restart the application and follow the on-screen instructions to complete activation (an internet connection is required). After restarting your Office application once more, click File tab | Help to see your activated status.
Option 2: From the Backstage view


Step 1: Open an Office 2010 Beta application (e.g. Word 2010 Beta) and click the File tab.

Step 2: Click the Help tab and then click the Change Product Key link.


Step 3: Enter the product key from the top of this page that matches the product you are activating and click “Continue.” On the next dialog, click “Install Now” to install your key. You will see a progress bar page and then a dialog box saying configuration has been successful. Click “Close.”


Step 4: Close and restart the application and follow the on-screen instructions to complete activation (an internet connection is required). After restarting your Office application once more, click File tab | Help to see your activated status.
Option 3: Control Panel


Step 1: Click on Start Menu  Control Panel  Programs and Features (or Add/Remove Programs, depending on your operating system). Click on your product, e.g. Microsoft Office Professional Plus 2010, then click “Change” on the top menu.

Step 2: Select the option to “Enter a Product Key.”

Step 3: Enter the appropriate product key from the top of this page and click “Continue.” On the next dialog, click “Install Now” to install your key. You will see a progress bar page and then a dialog box saying configuration has been successful. Click “Close.”

Step 4: Close and restart the application and follow the on-screen instructions to complete activation (an internet connection is required). After restarting your Office application once more, click File tab | Help to see your activated status......
(y) (y)